Backglass
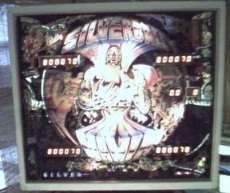
The backglass on this silverball was in excellent condition. It was so good, in fact, that I did nothing to it except coat it with Krylon Triple Thick. To do this, tape off the score and credit windows. Then apply a coat or Triple-Thick in a horizontal direction and then a second coat in a vertical direction. This will prevent the paint from peeling, lifting, scraping, while not really diminishing the brightness of the light shining through.
Cabinet
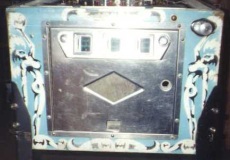
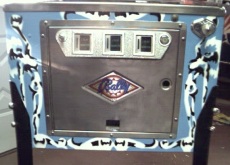
The actual structural integrity of this cabinet was pretty good. The paint job was typical of a game this old with a lot of faded colors, scratches, and scuffs, but no major blemishes. Some people might have been content with the game as it was, but after seeing my final result, I am glad that I restored it. Again, I used my usual process. For a complete explanation, read my explanation on Harlem Globetrotters, Flash Gordon, or Mata Hari.
- Attached tracing paper to the cabinet and copied the side and head artwork to the paper with all colors on one sheet. Most older games had three basic colors: a base color and two applied colors. At times it DOES make a difference in which the order of the colors is applied. So examine the cabinet color scheme carefully and write down the order in which the colors should be applied.
- I transferred the design for each color to acetate sheets in order to make a template.
- I carefully cut out the stencils for each color. For Silverball, you could use the same stencil for each side by flipping the stencil over. You do, however, have to measure and mark where to place the stencil on each side as its position in relation to the rail and bottom is different on each side.
- I placed the stencil on the sides to compare my stencil to the actual artwork. Be sure to check both sides to make sure your measurements are correct if you are "flipping" the stencil.
- Once satisfied with the stencil, I take pictures of the cabinet for safety sake. There is something reassuring about having a picture to go by later when you are painting the cabinet. Plus, you'll want to have a record of your before and after anyway.
- I strip the cabinet. I cover the railing with tape to protect from the stripper and the paint that comes off. Plus, it will need taping later when I paint, so I tape it off before stripping. I always use Citrus Strip. I really like the product. First, it seems to actually work better than some of the more harsh chemical products. Second, you can use it indoors as the odor isn't offensive and it's safe to breathe.
- I wipe down the cabinet with mineral spirits to remove all the leftover stripper and paint residue. Don't worry if every bit of paint doesn't come off, you are going to be sanding the cabinet, which will usually remove anything left.
- Next I repair any structural or major gouges. This game didn't have any so on to the next step.
- Fill in all scratches, holes, dings, with wood filler of bondo. For small areas I use wood filler while for large spots I use Bondo. This cabinet only needed wood filler for some spots.
- Next I sand the cabinet with 150 grit, 220 grit, and 320 grit sandpaper. I then wipe it down again with mineral spirits to remove any debris.
- Now the cabinet is ready for the base coat. In most cases, you do NOT need a primer coat. If your base color is really light, then you may want to apply a non-glossy white primer coat. I did this with the two Strikes and Spares machines I restored, but usually it is unnecessy. For Silverball, no primer was needed.
- I applied a base coat of Krylon glossy white. The paint on machines was not originally as glossy as this, but I like the glossy look when it is finished. You can decide for yourself if you want it glossy or not. It usually takes 3-4 cans for the base coat.
- Next it was time to apply the light blue. I couldn't find a Krylon color to match this blue. I searched arts and crafts stores until a found a match. I don't remember the name brand. All I remember is that it came in small spray cans instead of the larger cans like Krylon. Again, see the pictures and get more details by reading about the process on Harlem Globetrotters.
- After the blue was applied to the head, sides, and front, it was time to apply the black. I usually have the cabinet laying on its side and place the stencil on top and weight the stencil down to prevent udnerspray. On the second color I position the stencil carefully and then secure it with heavy weights.
- After all colors are applied I finish with Krylon clearcoat over the whole machine.