Playfield Mylar Removal Continued
I decided to remove the Mylar. My reasoning was that since this game would be a home-use only game, it wouldn't get that much wear and tear so removing the Mylar was safe.
There are two methods that I know of for removing Mylar: The heat/Goo Gone method and the freeze spray method. This was my first time removing Mylar, and at the time, I was most familiar with the Goo-Gone heat method. So that is the method I used. Today, I prefer the freeze method because for me it seems to run less risk of pulling up paint when you do it.
I am going to explain both methods, with the pros and cons of each. On this game I used the Goo Gone method.
Goo Gone Heat Method
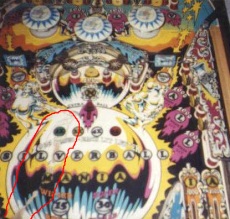
This method requires a bottle of Goo-Gone, a hair dryer, and a small, thin plastic scraper. The idea here is to breakdown the Mylar's adhesive using heat and Goo Gone. The trick is to find an area on the Mylar where it is already lifting. If you can't find a spot like that, then carefully use the plastic scraper to get a small edge in an inconspicuous place to lift up. An Exacto blade works well in place of a scraper, but you run a greater risk of accidentally scraping the playfield.
Once you have an area "lifting," spray some Goo Gone under the lifted area. As the Goo Gone is working breaking down the glue, apply low-heat with a hair dryer. The heat also helps break down the glue. The key here is to not use too much heat. Set the dryer on low heat if possible and don't apply the heat for more than 10 seconds at a time. After the Goo Gone has worked for about a minute, carefully and slowly try to peel away more of the Mylar. The key here is to take your time and not try to pull it up too quickly. As a little lifts up, spray more Goo Gone under the Mylar to start breaking down the new exposed adhesive. Continue this process slowly pulling up more Mylar. As you get going, larger areas become "exposed" making it easier to squirt and apply the Goo Gone. But remember, do NOT rush the process. Let the chemicals and heat do the work and remain patient. One danger is that when you get a large area up, you will be tempted to pull too quickly and hard to remove what is left and you might cause the paint to be removed with the Mylar.
The Freeze Method
The freeze requires a scraper and a can of compressed air used for cleaning computer keyboards. You can buy cans at any local office supply store. Again, try to find an area where the Mylar has already started to peel. If you can't find one, create a spot using the scraper as described above. Next, take the can and turn it upside down and spray the air under the lifted Mylar. The compressed air when sprayed out from the inverted can will be really cold. The cold air will break down the glue holding the Mylar. Slowly begin peeling the Mylar back and spray again. If you want, you can also use Goo Gone, but the cold spray is usually sufficient.
Pros and Cons
Like I said, on this game I used the heat method, but today I prefer the freeze method. Here are the pros and cons of each in my experience. The heat method tends to leave less glue residue on the playfield to remove later. But, it tends to also allow more paint lifting. I don't know if this is because of the method or just that on the games I tried it, the playfields had a greater tendency to lift anyway. The freeze method tends to go faster and cause less paint loss. Its only downside is that it leaves more glue residue on the playfield that you still have to remove later with Goo Gone. But, once the Mylar is off, it's easy to spray Goo-Gone on the residue and then use a little elbow grease to get it all removed.
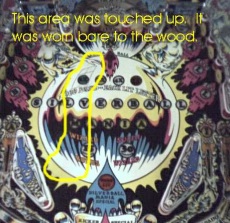
Touch Ups
The playfield had a couple of areas that were worn to the bare wood. In touching these areas up, I buy the $1-$2 bottles of acrylic paint from the arts and crafts store. I try to buy colors that match as close as possible out of the bottle. I then use trial and error mixing colors until I can get a match. I usually get my wife to help because she has more patience and color expertise. Just note that when the paint dries, it tends to darken, so you want to create it just a tad lighter when the paint is wet. As you can see from the pictures, my color match was very good for this game.
Since I use acrylic paints, if I apply a color and don't like it, i can easily wipe it up with a wet rag and try again. When doing touch ups, have patience and be willing to experiment and keep trying until you get it right. Once you have a match you are satisfield with, put some clear coat on your touch up to protect it.