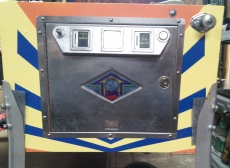
SECTION 2: Cabinet
Making Stencils
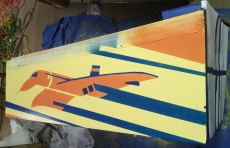
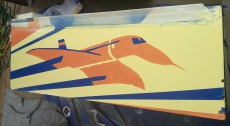
As with all of the repaints, I first taped tracing paper to the cabinet and then traced the cabinet design. Next, I transferred this to acetate sheets, one for each color. On Supersonic, the design was such that it required one orange stencil each for the head, front, and cabinet sides and then one blue stencil each for the head, front, and sides. The stencil only had to be “flipped” to be used on the left or right. However, the positioning is different on each of the sides so I had to measure and put placement markers for where to place the stencil on each side. You can buy the acetate sheets at most art stores or you can buy it on a roll from Hobby Lobby. The thicker sheets are easier to work with. The thinner sheets are a pain to cut out if the design has intricate details and the thin sheets tend to curl when painted which makes it more difficult when you try to paint the second side. So, even though the thicker acetate costs a bit more, it will save you a lot of aggravation. After cutting out the stencils, I laid the stencils on the cabinet to make sure that they lined up correctly. Once I was satisfied with the stencils, I stripped the old paint off of the cabinet. As always, I used Citrus strip. IMHO, this is the best stripper on the market. It works better than a lot of other strippers and it is safe to use indoors.
Repairing the Cabinet
After stripping the cabinet, I had to fix all of the imperfections, dents, and dings. This cabinet was in pretty good shape as far as the condition of the wood so it didn’t require any major repairs. There was one section on the side where the plywood began to delaminate. I fixed this putting wood glue between the pieces that had separated and then used clamps to press the wood back together.
To fix the dings and other imperfections, I used both wood filler and Bondo for this process. The wood filler works great for the smaller imperfections and is easy to work with. Bondo is great for bigger dings. Probably the only issue with wood filler is that when painted it doesn’t react exactly like the original wood. It contracts or expands differently than the wood. Thus, in some cases, areas that seem smooth and corrected before painting can then show up with slight imperfections after painting. Yet, none of this is consequential when completed and they add “character” to the cabinet. The biggest flaw in this cabinet was the back of the head unit. It was "splintering" and actually looked "fuzzy" the way the wood was splintering. I sanded this as smooth as I could. I wasn't worried if it wasn't perfect as this is in the back and isn't seen. After filling and repairing the dings, I sanded the cabinet with 150, 220, and 320 grit sandpaper and wiped it down with mineral spirits.
Painting the Cabinet
Next came the actual painting. I taped off the metal rails and other areas where I didn’t want to get over spray. I usually use Krylon paints for painting the cabinets. Years ago, they definitely had one of the best spray paints for the price. Recently, I think Krylon was bought by Rustoleum and they changed the formula a little bit. My experience with the new formula hasn't been as good as it was with the old formula. However, I decided to use Krylon anyway since it is readily available in a variety of colors and still works OK. The old formula allowed you to re-coat at any time and was dry in fifteen minutes. The new formula isn't as "forgiving" and it seems to go on thicker. They may have changed the formula to help it cover better, but you can't re-coat as quickly.
I sprayed a base coat of yellow. Since the sides have several straight line areas, I taped those areas off. Doing straight lines with tape is a lot easier than getting a clean straight line from an acetate stencil. I know that the original was painted completely with a stencil, but for me, it is easier to do the long straight lines by taping them. This meant measuring and marking each of the lines. It made for a lot of taping with the two colors but was probably best in the long run.
I was able to use the same stencil on both sides. I just had to flip the stencil over and then re-position it based on the positioning marks I had made earlier. I did have a couple of paint issues with this repaint. First, I got a little more "under" spray with the stencils than normal. I think this was due to the Krylon formula being "thicker" or "wetter" than I was used to. Second, while painting one of the colors, I actually had a small spot that I neglected to cover and so the wrong color got onto that area. I had to go back and repaint that spot. Third, I had one spot where my tape actually pulled up a small section of paint. I've never had that happen with Krylon paints. Again, I think that this may have been the result of their newer, wetter formula. I actually went back and fixed this by spraying some of the spray paint onto a plastic sheet using the plastic sheet as a make-shift palette. I then used a small paint brush to paint over the area.