SECTION 2: Cabinet
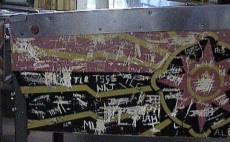
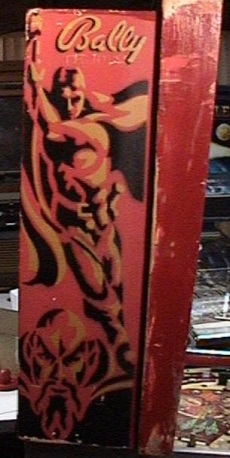
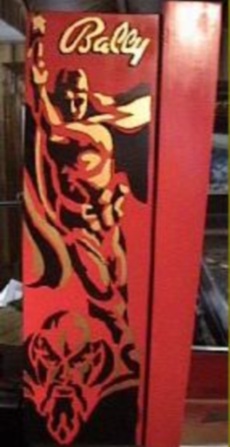
This was the worst cabinet I have ever seen. It was faded badly (red to pink) and had initials carved into most of the sides and front. In fact, the right side had more carvings than paint on it. Below is the procedure I used for restoring this cabinet. First, I made stencils of the designs on the sides. The cabinet had three colors. Red was the base color, while black and gold were the applied colors. The design on the head was very detailed, while the sides were fairly simple. I made the stencils by first tracing the design onto tracing paper. I marked the black and gold sections appropriately on the paper. I then transferred this to clear acetate sheets. Stencils had to be made for each color and for each cabinet side, each head side, and the front of the cabinet. Thus, there were nine stencils (the front only needed one stencil since the black covered the bottom half).
Next, the cabinet was stripped. I used Citrus strip. IMHO, this is the best stripper on the market. It works better than a lot of other strippers, and it is safe to use indoors. After stripping the cabinet, I had to fix all of the imperfections, dents, dings, and carvings. I used both wood filler and Bondo for this process. The wood filler works great for the smaller imperfections and is easy to work with. Bondo is great for bigger dings. I then sanded the cabinet with 150, 300, 400 grit sandpaper wiping it with mineral spirits in between to remove the particles.
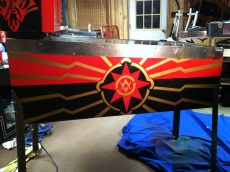
Next came the actual painting. I taped off the metal rails and other areas where I didn't want to get over spray. The base color was red. I sprayed about three coats of Krylon red. For this particular machine, I purposely made the paint job a little "heavier" than the original. I wanted a deeper, richer look than the original cabinets had. Thus, I probably used an extra coat of paint, but the end result was worth it. After the red, I sprayed the black and then the gold. The trickiest part here was in lining up the stencils. Usually, you can mark the placement of stencils by their relation to the edges and side rails. However, the center "star" had no point of reference without making one. Previously, I marked the stars points with marks on the side rails and underneath the cabinet. I also measured the distance from the point to the rails and bottom of the cabinet. This allowed me to position it correctly,
I made one goof on the paint job as shown in the picture pages. As you can see, I had to repaint the first two inches of the gold stripe near the rear leg because I accidentally removed the paint in a spot doing something stupid. Anyway, if you look closely you can see where the two paint jobs "join." Fortunately, it isn't very noticeable unless you are looking for it. When I sprayed the gold on, The section at the rear didn't cover quite as well. So, I got in a hurry and was going to spot spray that spot. In my haste, I got the can too close to the spot. This caused the paint to "pool" and then it actually lifted off the first coat of gold. So, I had to remove all of the gold on the back two inches and repaint the area. Again, my haste caused this to happen. In the end, the paint job turned out the great. The pictures really don't do the look of the machine justice. The colors and the detail are rich and vibrant.
SECTION 3: Playfield
Part 1: Mylar Removal
Both the upper and lower playfields were covered with Mylar. Personally, I do NOT like Mylar, because it slows down the ball. However, if a playfield has Mylar on it and is in good shape, I might decide to leave it on. On this machine, I compromised. I left the Mylar on the upper playfield. The upper playfield had no wear and so it seemed good to leave the Mylar on. The lower playfield had some very minor wear that developed before the Mylar was put on. I decided to remove the Mylar here and touch up those areas.
Mylar removal is not that difficult. The procedure I used is as follows. You can see some pictures of the process by looking at some pictures I took removing the Mylar from my Xenon. Note that today I prefer the freeze method as described here. Materials: Goo Gone, hair dryer, a linoleum or exacto knife, and plenty of paper towels. Squirt Goo Gone on the edges of the Mylar. If you have an area where the Mylar has already started lifting, then squirt it there. Let the goo gone work for about 30 seconds. Then try to slowly pull the Mylar up. To help in the removal, you may also want to use the hair dryer to heat the Mylar. This loosens the adhesive. Just remember, do not use the heat for more than 15-30 seconds. Also, do not heat the playfield directly. Apply the heat to the top of the Mylar. The linoleum knife or exacto knife is used to help get started on the edges. Be careful to not damage the playfield with the blade. The key is patience, patience, patience. Do not rush the process. Let the Goo Gone and heat do the work.
I have done three Mylar removals and the average time for just removing the Mylar without the cleanup was an hour and a half. Be especially careful around playfield inserts. This is where you will have the most danger of having paint lift off. Once the Mylar is removed, it will take a lot of Goo Gone and elbow grease to remove the adhesive residue left from the Mylar. Again, let the Goo Gone work and take your time. You can also use Naphtha to help get the residue off, but be warned, if you let it sit too long before wiping it off, it can cause some lifting.
The finished result on the Flash Gordon was that the playfield was both shinier and faster. Mylar tends to dull the shine of a playfield and it definitely slows it down. After removing the Mylar, I was amazed at how fast the lower playfield was. It plays like a rocket!