Cabinet Continued
You can buy the acetate sheets at most art stores or you can buy it on a roll from Hobby Lobby. The thicker sheets are easier to work with. The thinner sheets are a pain to cut out if the design has intricate details and the thin sheets tend to curl when painted which makes it more difficult when you try to paint the second side. So, even though the thicker acetate costs a bit more, it will save you a lot of aggravation.
After cutting out the stencils, I laid the stencils on the cabinet to make sure that they lined up correctly. Once I was satisfied with the stencils, I stripped the old paint off of the cabinet. I used Citrus strip. IMHO, this is the best stripper on the market. It works better than a lot of other strippers and it is safe to use indoors.
The repaint usually takes several days. This cabinet had a black background that I applied after the repairs (mentioned below). I used Krylon spray paint. I like their paint because it can be re-coated at any time and it has good coverage. (Note: In recent years they have changed the formulation to make it “thicker” for better coverage but you can’t re-coat at any time.)
After applying the black, the first color I applied was the red. On the left side I didn’t do the 777 with the stripe. I did the red line, then the white number border, and then the red 777. I usually do the right side of the head and the right side of the cabinet first. On the next day, I will do the second color on the right side meaning I have one side completely done before starting the other side. The reason I do this is so that if I run into any issues, I can figure out how to correct or prevent them before doing the second side and hopefully can prevent myself from having the same problem on the other side.
I applied the reds first. On the right side, I painted the red 777 before the white. On the left side, I painted the red lines, then the white border, and then the red 777. This helped in centering the white and reds. This brings up an issue when repainting a cabinet. At times, as in this case, it helps to take an extra day and divide one color into two painting sessions. Each cabinet is different so you have to think through the process before you paint.
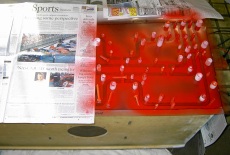
The next day after the red was applied, I sprayed the white. As a note, if you look at my pictures, you will see that I make sure the stencil lays flat by placing weights along the edges. Some guys spray a light adhesive to the stencil but I find that this makes repositioning difficult.
On the third day, I came back and did the red sevens inside the white on the left side. Since this wasn’t necessary on the head, I started the red on the left side of the head. On day four, I did the white on the left side of the head, and then the first red coat on the left side of the cabinet. On day five I did the white on cabinet left . Finally, I applied a Krylon clear coat to help protect the cabinet. In the end, the final result was very good, especially considering what I started with. The pictures don’t do justice to the actual before and after difference.
Repairing the Cabinet
After stripping the cabinet, I had to fix all of the imperfections, dents, and dings. This cabinet was in very rough shape. In fact, overall it may be the worst cabinet I have repaired. Two of the corners had heavy damage, the front had an area where the wood’s layers had separated and a “gouged” out area was left. The rear and the neck also had several of these gouged out areas and the neck had spots where the wood had splintered. Many of the bolt holes were severely worn and splintered. Repairing these areas took quite a while. It was more than just filling with Bondo or wood filler. I had to make a “mold” for the filler in some places and in one spot I put in new pieces of wood for re-enforcement. To explain better, I placed a smooth piece of wood along the edge I needed to rebuild and then filled that area with Bondo. It looked similar to a form you would use when pouring concrete, except that I did it with underside of the cabinet. The wood piece acted as a mold to keep the bondo in the right position and keep its edge smooth. After filling the imperfections and repairing the damage, I sanded the cabinet with 150, 220, and 320 grit sandpaper and wiped it down with mineral spirits. This got it ready for the painting.